GitHub extension authoring
From the beginning of MakeCode, a facility was provided to extend the editor with user extensions hosted on GitHub. These extensions can even introduce their own user interface in the editor. Extensions first need approval to surface in search but, unless they are banned, can be loaded without approval by providing an exact URL.
Until recently, extension authoring required usage of command line tools (npm and git, along with the required npm packages), which could present quite a barrier to aspiring extension writers. Instead, you can create extensions and publish them to GitHub directly from the web app, without ever touching command line or installing anything.
GitHub account and repo
First, you need a GitHub account if you don’t have one yet. GitHub is the largest host of source code in the world, with over 30 million users.
Once you have your account, you’ll need to tie the MakeCode web app to your account. To do that, open any project, go to the Gear Wheel menu on top, and select Extensions. At the bottom, there should be a link to log in to GitHub. If there’s no link in your editor, try using its /beta version. A dialog will appear asking you to generate a GitHub token. Follow the instructions and paste the token into the dialog. You’ll need to paste in a token again for each editor you use (micro:bit, Circuit Playground, etc.), though you can use the same token for all of them.
Once you’ve logged in, go back to the home screen. Now, the dialog that comes up after you press the Import button will have an additional option to list your GitHub repositories or create a new one. Additionally, the Import URL option will now support https://github.com/... URLs, which is useful if you can’t find your repository in the list (especially organizational repos), or as way to search the list faster using a copy/paste of the URL.
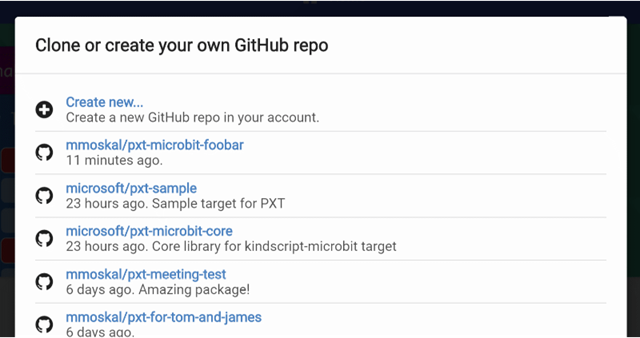
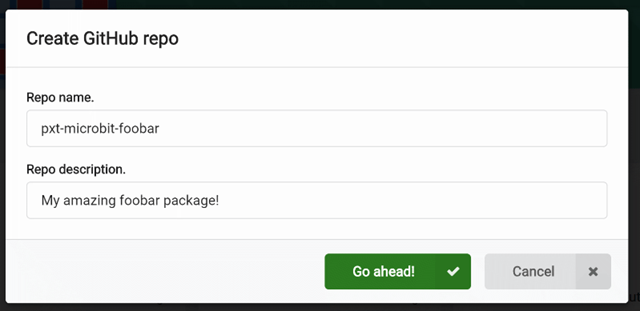
If you import a completely empty repo, or create a fresh one, MakeCode will automatically initialize it with pxt.json and other supporting files. If you import a non-empty repo without the pxt.json file, you will be asked if you want it initialized. Note that this might overwrite your existing files.
Currently, there is no way to push an existing project into GitHub. As a workaround, create a new project and copy/paste the contents of the main.ts file.
Commit and push
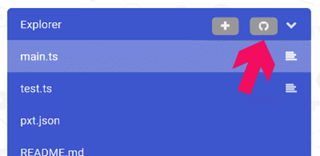
Once you have your repo set up, edit files as usual. Whenever you get to a stable state, or just every now and then to keep history and insure against losing your work, push the changes to GitHub. This is done with a little GitHub sync button on top of the Explorer. The button will check if there are any pending changes to check in. If there are, it will create a commit, pull the latest changes from GitHub, merge or fast-forward the commit if needed, and push the results to GitHub.
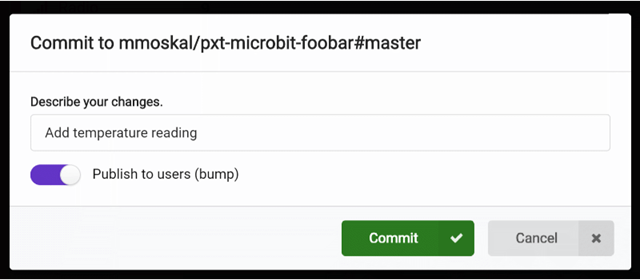
If there are changes, you will be asked for a commit message. Try to write something meaningful, like Fixed temperature reading in sub-freezing conditions or Added mysensor.readTemperature() function.
When describing changes, you are also given an option to bump the version number. This is a signal that the version you’re pushing is stable and the users should upgrade to it. When your extension is first referenced, the latest bumped version is used. Similarly, if there is a newer bumped version, a little upgrade button will appear next to the extension. Commits without bump are generally not accessible to most users, so they are mostly for you to keep track of things.
There’s really no distinguishing between a commit, push, and pull - it all happens at once in the sync operation.
You can view a history of changes by following the version number link on the Project Settings page.

There’s also another button next to the GitHub sync - you can use it to add new files to the project. This is mostly to help keep the project organized. For the TypeScript compiler it doesn’t matter if you use one big file or a bunch of smaller ones.
Releases
After committing your changes, you will have the option to create a release of your extension. A release clears the cache and ensures that the latest version of your extension will be loaded (this feature is still rolling out to some targets, so double check that it is supported in your editor).
Optimize for Tutorials
When creating a release for tutorials hosted on Github, you may also choose to optimize your repository. This will precompute some information about the markdown files, and save the data in a tutorial-info-cache.json file. Your tutorial will then load faster when the user opens it. This checkbox has no effect on non-tutorial extensions.
Conflicts
It’s possible that multiple people are editing the same extension at the same time causing edit conflicts. This is similar to the situation where the same person edits the extension using several computers, browsers, or web sites. In the conflict description below, for simplicity, we’ll just concentrate on the case of multiple people working on the same extension.
Typically, two people would sync a GitHub extension at the same version, and then they both edit it. The first person pushes the changes successfully. When MakeCode tries to push the changes from the second person, it will notice that these are changes against a non-current version. It will create a commit based on the previous version and try to use the standard git merge (run server-side by GitHub). This usually succeeds if the two people edited different files, or at least different parts of the file - you end up with both sets of changes logically combined. There is no user interaction required in that case.
If the automatic merge fails, MakeCode will create a new branch, push the commit there, and then create a pull request (PR) on GitHub. The dialog that appears after this happens will let you go to the GitHub web site and resolve the conflicts. Before you resolve conflicts and merge the PR, the master branch will not have your changes (it will have changes from the other person, who managed to commit first). After creating the PR, MakeCode moves your local version to the master branch (without your changes), but don’t despair they are not lost! Just resolve the conflict in GitHub and sync to get all changes back. MakeCode will also sync automatically when you close the PR dialog (presumably, after you resolved the conflict in another tab).
Testing your extension
To test blocks in your extension, press the New Project button on the home screen and go to the Extensions dialog. It will list all your GitHub projects as available for addition. Select your extension and see what the blocks look like.
You can have one browser tab open with that test project, and another one with the extension. When you switch between them, they reload automatically.
For testing TypeScript APIs you don’t need a separate project, and instead can
use the test.ts file in the extension itself. It is only used when you run the extension
directly, not when you add it to a project. You can put TypeScript test code in there.
Documenting your extension
MakeCode displays a Help option in the context menu when the user right-clicks on a block. By default, clicking this for an extension block will open the README file of the extension’s repository and show it in a new window. You can choose to add information describing the extension’s blocks within in the README or in separate document pages.
Setting help paths for each block
To determine where help information comes from, you can add the help attribute to the jsDoc in the header of the function or method that defines the block. In this example, the help attribute is added at the end of the header of the block definition and set to none.
namespace myblocks {
    /**
     * Return a fibonacci number for the value given
     * @param value position in a fibonacci sequence, eg: 5
     */
    //% blockId=fibonacci_number
    //% block="fibonacci number of %value
    //% weight=100
    //% help=none
    export function fibonacci(value: number): number {
        return value <= 1 ? value : fibonacci(value -1) + fibonacci(value - 2);
    }
}
Setting help to ‘none’
To disable any help for the block, use the help attribute of none: //% help=none.
If don’t want the extension’s README used as help for blocks and no separate document page is available for a block, set its help path to none.
Setting help to a document page
To use a custom help file for a block, specify a path in the repository of a markdown document to use. This is done by setting the help attribute in this format:
//% help=github:<repository-name>/<path-to-file>For the fibonacci example, if the help document is in the ./docs folder of the myblocks extension repository, the help attribute would have this setting:
//% help=github:myblocks/docs/fibonacciThere is NO file name extension used here, .md as in fibonacci.md, since the file is assumed to be a markdown file.
Block reference page format
Although there is no requirement as to how you write and format a block help page, it is recommended to use the simple MakeCode reference page format in markdown. The page format includes:
- a title which is the block’s function name
- a descriptive sentence
- the block’s signature
- a description list of the parameters
- the value returned
- a usage example
- an optional set of ‘See also’ links to related pages
- the
packagespecification for the extension
The following is a simple markdown example of a reference page for the fibonacci block:
# fibonacci

Return the fibonacci number for a given sequence value.

```sig
MyBlocks.fibonacci(5)
```

## Parameters

**value**: a [number](/types/number) that is a position in the fibonacci sequence.

## Returns

* the fibonacci [number](/types/number) at the sequence position of **value**.

## Example

Display the fibonacci number of `11`.

```blocks
console.log("The fibonacci number for 11 is:" + MyBlocks.fibonacci(11))
```

## See also

[number](/types/number)

```package
myblocks=github:myaccount/myblocks
```
The help document page is placed under the ./docs folder of the extension’s repository and saved using the name of fibonacci.md:
myblocks/docs/fibonacci.mdMake sure to add the ```package specification for your extension in order for the signature and snippets to work properly in the document.
See the package section in the snippets page for the proper format.
Non-extensions
The GitHub feature is not limited to extensions. You can also use it to store other MakeCode projects. You can even use it to collaborate on a project with multiple people.
Currently, any GitHub project will show up in your Extensions dialog though.
Limitations
The web app will not let you create extensions with C++. This you still need to do from command line, after installing all required compilers or Docker (depending on target). The good news is that very few extensions contain C++ (mostly because TypeScript is easier to write, test, and in most cases sufficient). The main reason seen so far for needing C++ extensions is the lack of floating point support on the micro:bit (this is now fixed with the v1 release).
Additional notes
- You can use a non-
masterbranch by going to Import URL and saying something likehttps://github.com/jrandomhacker/pxt-mypkg#mybranch. User note, this hasn’t been extensively tested yet. - MakeCode will generally only download files listed in
pxt.json. Files in GitHub but not inpxt.jsonwill be ignored and left alone. - The GitHub authoring feature is now available in all MakeCode editors.